In this article, we will cover how to create a custom robots.txt in Episerver CMS without using any third-party DLLs.
The content of robots.txt will be manageable from Episerver CMS so Content Author can easily modify the content from CMS Input.
Robots.cs
Create a Model named Robots.cs inside Models/Pages Folder and replace the code given below.
using EPiServer.DataAbstraction;
using EPiServer.DataAnnotations;
using System.ComponentModel.DataAnnotations;
using EPiServer.Web;

namespace HpBlogs.Models.Pages
{
    [ContentType(DisplayName = "Robots.txt", GUID = "60a8acc3-6c30-4dac-94b5-98f75b23f3d6", Description = "Robots.txt")]
    public class Robots : PageData
    {
        [Display(Name = "Content", Order = 1)]
        [UIHint(UIHint.Textarea)]
        public virtual string Content { get; set; }
    }
}
RobotsController.cs
Create a controller named RobotsController.cs and replace the existing code given below.
using EPiServer.Web.Mvc;
using HpBlogs.Models.Pages;
using System.Web.Mvc;

namespace HpBlogs.Controllers
{
    public class RobotsController : PageController<Robots>
    {
        public ActionResult Index(Robots currentPage)
        {
            string robotsContent = currentPage.Content; // Get content from cms
            return Content(robotsContent, "text/plain");
        }
    }
}
Login to Episerver CMS and Create a Robots Page in Root Folder.
Change the "Name in URL" from Robots to robots.txt
Add the content as per your requirement in "Content" Input.

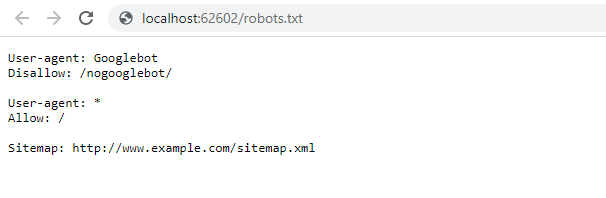
Browse the Page to check the robots.txt file
Post Comments(0)