In this article, we will cover how to create Blocks and display them on the page in Episerver CMS.
We will also cover how to limit the selection of Blocks in Episerver CMS Input using ValidationAttribute.
In Episerver CMS, Blocks are nothing but a Partial View (Shared Content) that can be used across pages.
MaxItemCountAttribute.cs
Create a Class named MaxItemCountAttribute.cs inside Helpers Folder and replace the code given below.
This class will be used to limit the selection of Blocks as per the specified limits. It will give an error message if we try to add the above limits.
using EPiServer.Core;
using System;
using System.ComponentModel.DataAnnotations;
using System.Linq;

namespace HpBlogs.Helpers
{
    [AttributeUsage(AttributeTargets.Property, AllowMultiple = false)]
    public class MaxItemCountAttribute : ValidationAttribute
    {
        private int _maxItemsAllowed;

        public MaxItemCountAttribute(int MaxItemsAllowed)
        {
            _maxItemsAllowed = MaxItemsAllowed;
        }

        protected override ValidationResult IsValid(object value, ValidationContext validationContext)
        {
            int incr = 0;
            var contentArea = value as ContentArea;
            var allItems = contentArea?.Items ?? Enumerable.Empty<ContentAreaItem>();

            var maxNumberOfItemsAdded = allItems.Select(x => string.IsNullOrEmpty(x.ContentGroup) ? (incr++).ToString() : x.ContentGroup).Distinct().Count();

            if (maxNumberOfItemsAdded > _maxItemsAllowed)
                return new ValidationResult($"Maximum {_maxItemsAllowed} selection allowed for The property \"{validationContext.DisplayName}\"");
            else
                return null;
        }
    }
}
Now create the Block mentioned which we are going to use across pages.
RelatedLinks.cs
Create a Block named RelatedLinks.cs inside Models/Blocks folder and replace it with the code given below.
using EPiServer.Core;
using EPiServer.DataAbstraction;
using EPiServer.DataAnnotations;
using EPiServer.SpecializedProperties;
using System.ComponentModel.DataAnnotations;

namespace HpBlogs.Models.Blocks
{
    [ContentType(DisplayName = "Related Links", GUID = "98921f28-02d7-43d8-9ca2-32c1ac6f830a", Description = "")]
    public class RelatedLinks : BlockData
    {
        [Display(Name = "Title", Order = 1, GroupName = SystemTabNames.Content)]
        public virtual string Title { get; set; }

        [Display(Name = "Sub Title", Order = 2, GroupName = SystemTabNames.Content)]
        public virtual string SubTitle { get; set; }

        [Display(Name = "Links", Order = 3, GroupName = SystemTabNames.Content)]
        public virtual LinkItemCollection Links { get; set; }
    }
}
RelatedLinks.cshtml
Create a cshtml Block named RelatedLinks.cshtml inside Views/Shared/Blocks folder and replace it with the code given below.
@using EPiServer.Web.Mvc.Html
@using HpBlogs.Models.Blocks;

@model RelatedLinks

@if (Model.Links != null)
{
    <section class="text-center p-4">
        <div class="container">
            <h6>@Model.Title</h6>
            <p>@Model.SubTitle</p>
            <p>
                @foreach (var link in Model.Links)
                {
                    <a class="btn btn-primary my-2" href="@Url.ContentUrl(@link.Href)" target="@link.Target">@link.Text</a>
                }
            </p>
        </div>
    </section>
}
Now we will create a Page where we will display the RelatedLinks Block.
The Page will have 2 Different Input selections for Blocks.
1) Input to allow multiple selections of Blocks
2) Input to allow single selection of Block
HomePage.cs
Create a Model Class named HomePage.cs inside Models/Pages Folder and replace the code given below.
using EPiServer.Core;
using EPiServer.DataAbstraction;
using EPiServer.DataAnnotations;
using HpBlogs.Helpers;
using HpBlogs.Models.Blocks;
using System.ComponentModel.DataAnnotations;

namespace HpBlogs.Models.Pages
{
    [ContentType(DisplayName = "HomePage", GUID = "3b09891e-37ae-46d4-bb62-6dba1adeb166", Description = "Home Page")]
    public class HomePage : PageData
    {
        [Display(Name = "Title", Order = 1, GroupName = SystemTabNames.Content)]
        public virtual string Title { get; set; }

        [Display(Name = "Description", Order = 2, GroupName = SystemTabNames.Content)]
        public virtual XhtmlString Description { get; set; }

        [Display(Name = "Related Links - Multiple Selection", GroupName = SystemTabNames.Content, Order = 3)]
        [AllowedTypes(new[] { typeof(RelatedLinks) })]
        public virtual ContentArea RelatedLinks_Multiple { get; set; }

        [Display(Name = "Related Links - Single Selection", GroupName = SystemTabNames.Content, Order = 4)]
        [AllowedTypes(new[] { typeof(RelatedLinks) })]
        [MaxItemCount(1)]
        public virtual ContentArea RelatedLinks_Single { get; set; }
    }
}
HomePageController.cs
Create a Controller Class named HomePageController.cs inside Controllers Folder and replace the code given below.
using EPiServer.Web.Mvc;
using HpBlogs.Models.Pages;
using System.Web.Mvc;

namespace HpBlogs.Controllers
{
    public class HomePageController : PageController<HomePage>
    {
        public ActionResult Index(HomePage currentPage)
        {
            return View(currentPage);
        }
    }
}
Index.cshtml
Create a View named Index.cshtml inside Views/HomePage Folder and replace the code given below.
@model HpBlogs.Models.Pages.HomePage

@{
    <p class="text-center p-2" style="background-color:yellow">Related Links - Multiple Selection Example</p>
    if (Model.RelatedLinks_Multiple != null)
    {
        @Html.PropertyFor(m => m.RelatedLinks_Multiple,
        new { HasContainer = false, HasItemContainer = false, HasEditContainer = false })
    }


    <p class="text-center p-2" style="background-color: yellow">Related Links - Single Selection Example</p>
    if (Model.RelatedLinks_Single != null)
    {
        @Html.PropertyFor(m => m.RelatedLinks_Single,
        new { HasContainer = false, HasItemContainer = false, HasEditContainer = false })
    }
}
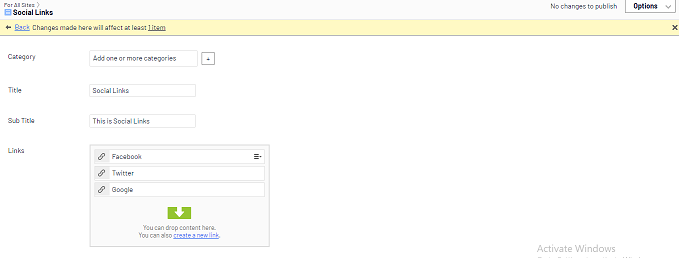
Login to Episerver CMS and Create Two Related Links Bloks inside the "Blocks" Tab and "For All Sites" as shown below Image.

1) Related Links
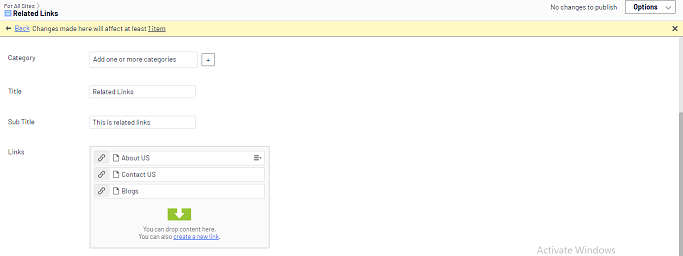
2) Social Links
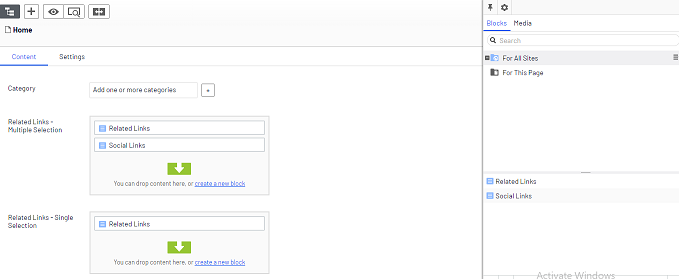
Now Create a Home Page in the Root Folder and Select the Blocks as shown in the image below.
Try to add multiple blocks for single selection input to check the validation.
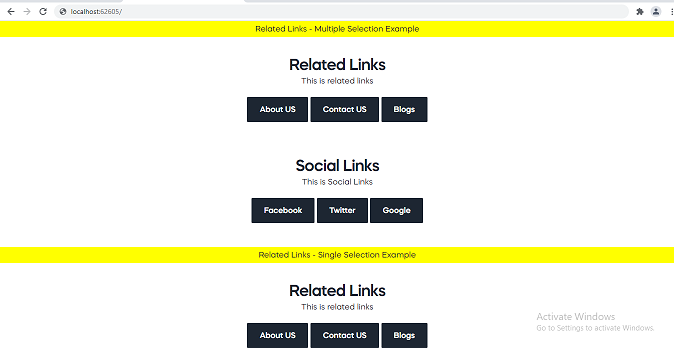
Browse the Home Page to check the content of Related Links blocks
Here we are done with the creation of blocks. These blocks now can be used on any page. Just add the input selection for the block like the home page.
Post Comments(0)